16 Apr

Girl Stuff Soirée (with Wild Berries)

Hi gals!
I feel sad that I haven’t been able to post as much as usual lately. I’ve been nursing a cough/cold for 2 weeks now, and we have been preparing for our trip to Texas. We leave in the morning, and while I am not looking forward to the long trip, I am looking forward to being with our family and friends there.

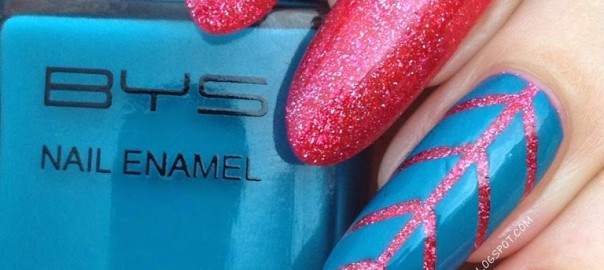
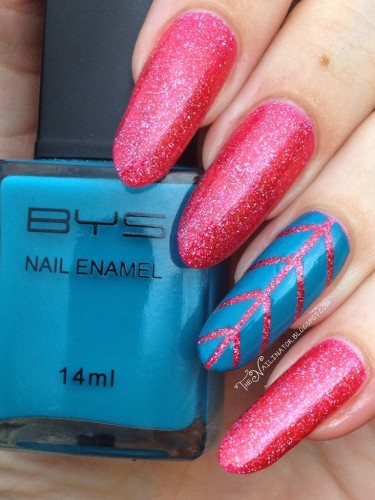
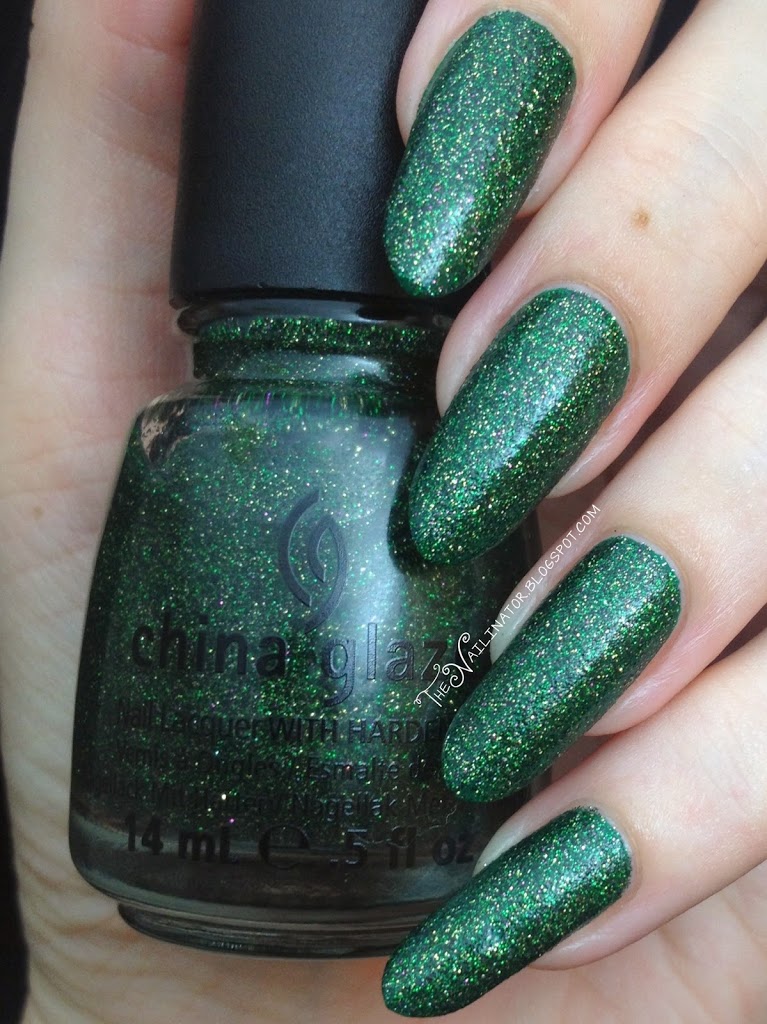
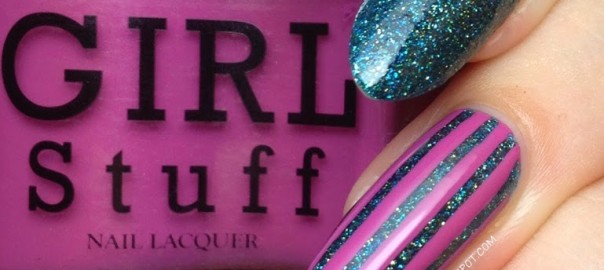
I’m so thrilled to finally have Girl Stuff Soirée in my collection. It’s been on my lemming list since I saw it in December. I finally ordered it a couple of weeks ago, and of course, I had to use it immediately. It’s a teal jelly base loaded with teal, green, purple and gold glitter. There is also a splash of holo in it that is lovely. I applied 2 coats and enjoyed the sparkly, textured finish for a couple of days. Then I applied top coat and loved it even more. The glitter really sparkles like crazy with top coat. It needed two coats to make it smooth.

Girl Stuff Soirée with Wild Berries and top coat

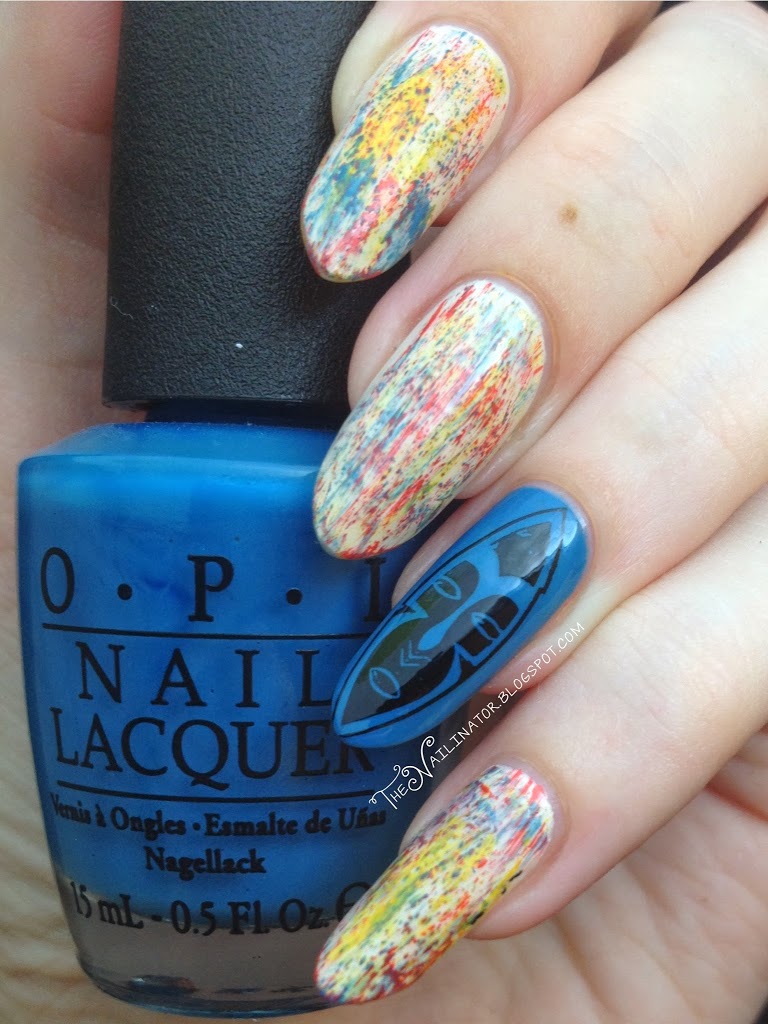
For my accent nail, I placed striping tape on the nail and then added one coat of Wild Berries (which Girl Stuff sent me as a bonus from their new Summer Collection. Thanks again, Girl Stuff!) and peeled off the tape before it could dry. Wild Berries is a pinkish purple that is very flattering.

Girl Stuff Soirée swatch


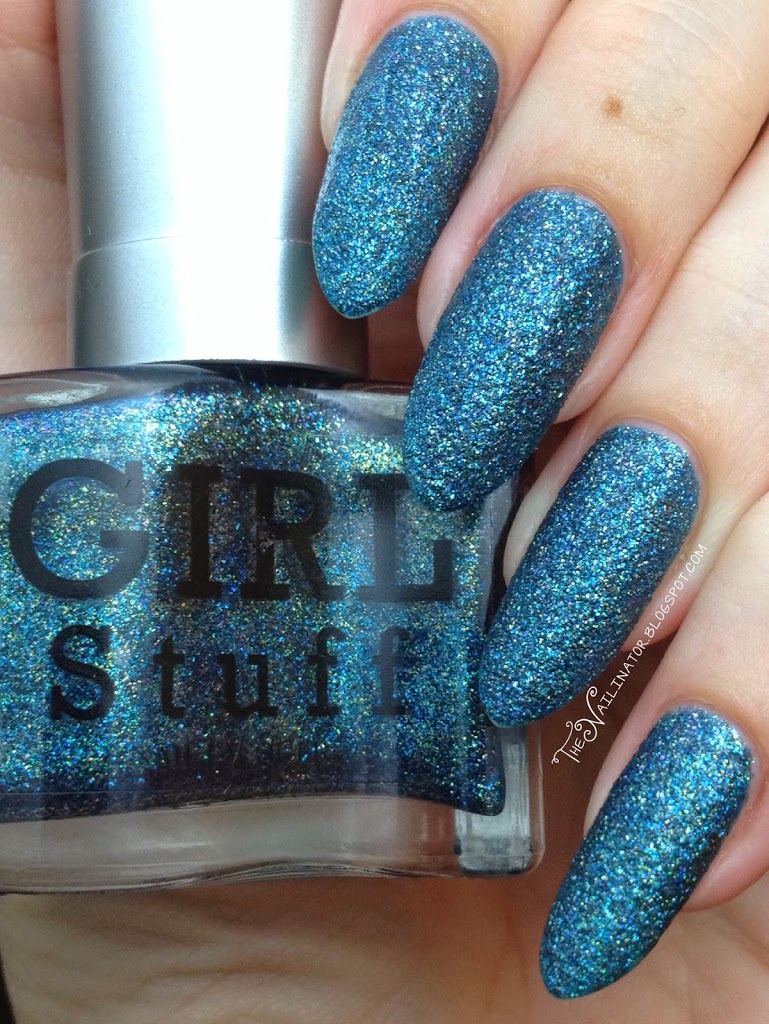
Here is a shot of Soirée on its own, without topcoat. Both Soirée and Wild Berry dried quickly and were easy to use. Girl Stuff polishes are 3 free too so that is great! Check out their FB page or Instagram to see more of their pretty polishes.

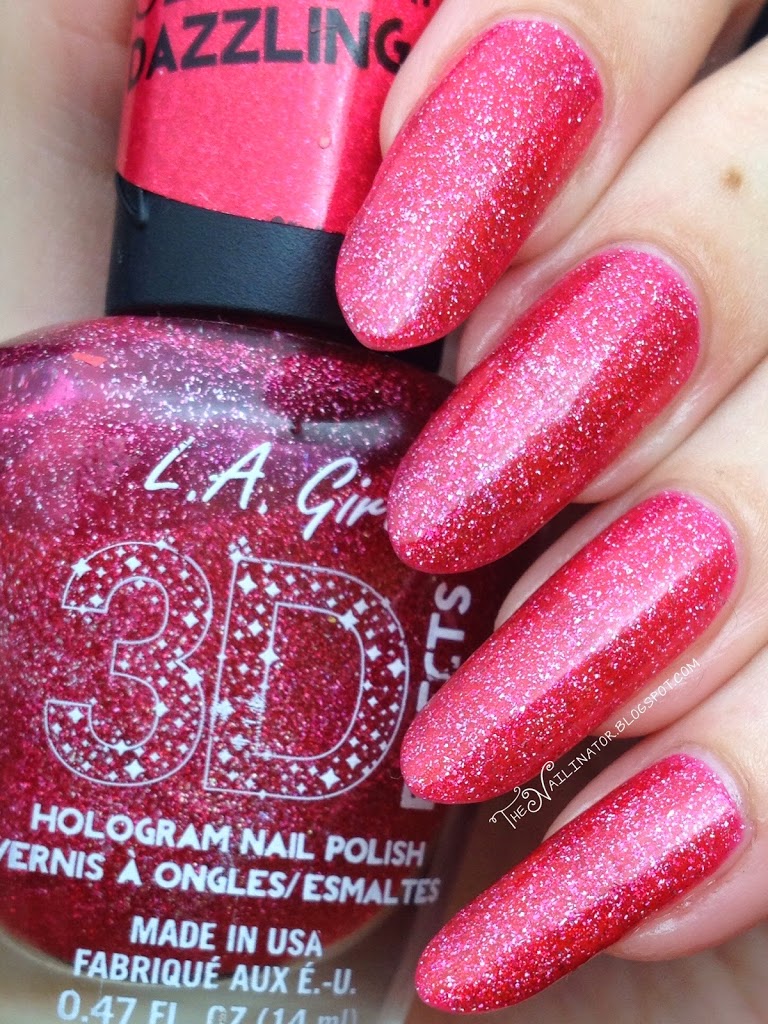
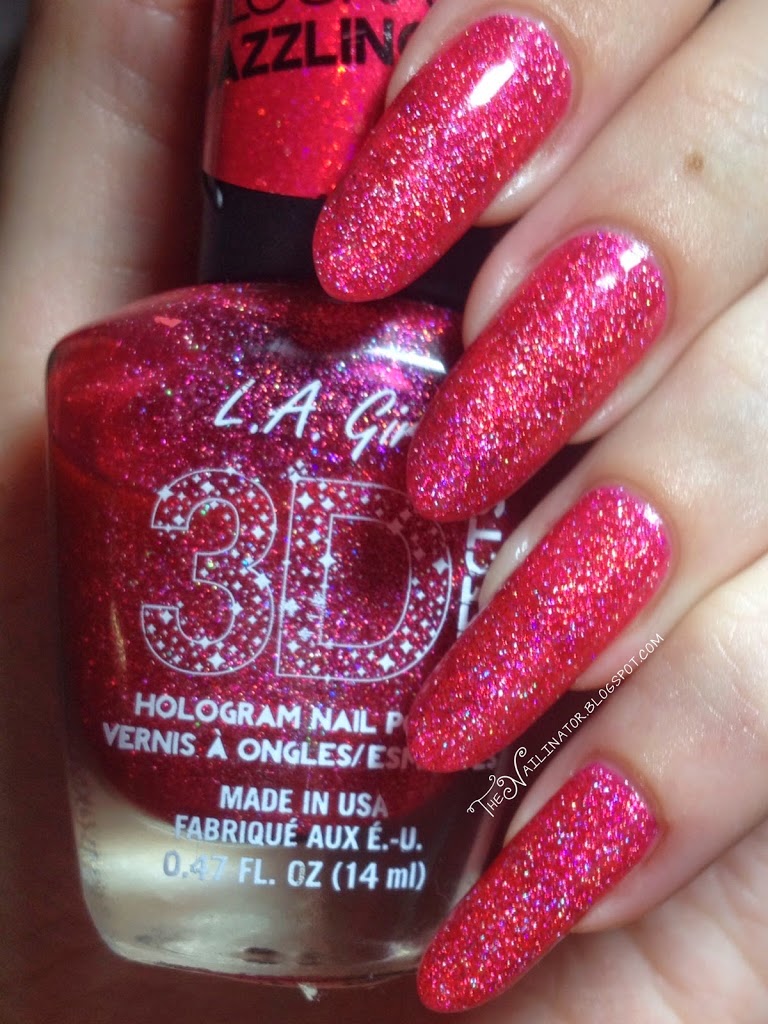
I think you will see Wild Berries again soon as it made in into my luggage for the trek across the globe. Believe it or not, I’ve only packed a few polishes to bring. I am planning to pick up a few in the US, so I tried to limit myself to about 10. Success!

That’s all from me for now. I’m going to try to get a bit of sleep before we have to load up and head to the airport. I’m excited because the hubby bought me an awesome “Greatest Hits of the 1950’s” album for me for the trip in honor of our anniversary which is also today. Nine years baby! Woohoo! Next time you hear from me, I should be in Texas enjoying some Mexican food, Dr. Pepper, and shopping (with coupons!) at Kohl’s!

I hope you have a fabulous day!
Hugs,
Rach

06 Apr

L.A. Girl 3D Effects Dazzling Pink with BYS Fool’s Paradise Accent

Hi Gals!
Happy weekend! I’ve had an annoying sinus headache all day (all week off and on actually) but it has still been a nice day. The kids spent the afternoon with my parents and they are spending the night so I’ve had a little extra dose of peace around here. I spent it well this evening watching the 2nd half of The Fellowship of the Ring with Mr. Nailinator. He’s got the “platinum extended edition” so we watched all the extra scenes. I just recently decided to read the trilogy and I am enjoying them so much. I read the Hobbit as a young girl and it wasn’t my cup of tea back then. But I am loving the books now.

I’ll stop babbling now and get on to the main event. This isn’t a book blog after all. I’ve got a simple but fun look to show you today. I started with 3 thin coats of L.A. Girl 3D Effects Dazzling Pink. For my accent nail, I placed striping tape over the pink in the pattern seen below and polished over it with one thick coat of BYS Fool’s Paradise which was gifted to me by the lovely Rina of Simply Rins. (Thanks again Rins!) I quickly and carefully peeled off the striping tape and ended up with this.

L.A. Girl 3D Effects Dazzling Pink with accent

Cool huh?  I am loving accent nails these days. I have tried some edgy things I feel I might not yet be able to pull off on all ten nails. It’s easier to commit to something bold on two nails than on ten when you are unsure if you can handle it.

I’ve got to tell you more about my base color. I’ve raved about these LA Girl polishes before, and I’ll keep doing so because they really are some of the best out there. Dazzling Pink is the least opaque of the ones I’ve worked with so far. (I’ve used all but the purple, silver and orange) Three coats builds nicely, dries quickly and is just gorgeous. The sparkle and depth in this (and all the polishes in this line) is to die for. I’ve included a fuzzy picture in direct lighting so you can see the holo sparkle. Additionally, I wore this for a whole week with minimal tip wear. Two Dazzling Pink thumbs up from me!

L.A. Girl 3D Effects Dazzling Pink swatch
L.A. Girl 3D Effects Dazzling Pink in different lighting

I hope you have a great weekend and that you get to spend it with those most dear to you.
Hugs!
Rach

01 Apr

Caronia Art of Dance Collection Swatches and Review (Pique, Chasse, and Glissade)

Hi Gals!
Sorry for the silence the past couple of weeks. I went out of town unexpectedly and have also been dealing with some health issues. Additionally, we are gearing up for taking a trip to the US in just 2 short weeks. So, life is just a bit hectic at the moment. I have been able to do my nails a little here and there but sitting down to get a post together is a bit difficult. Despite these hurdles, life is good and I am blessed.

I’m so excited about today’s post. It’s not every day that one of our beloved Philippine brands comes out with a new polish collection. Caronia Philippines has partnered with Ballet Philippines to release three lovely shades for their new “The Art of Dance” Collection.

The polishes are all named after ballet moves. Pique is the perfect salmon pink, Chasse is a stunning royal blue, and Glissade is a gorgeous green that is SO hard to photograph accurately.

Lets get right to the swatches, shall we?

Pique
 Chasse
Glissade
(I was unsuccessful in my attempts to capture the vibrance of this green. To get a better idea of what it looks like in person check out the poster below and see the green there.)

Aren’t they gorgeous?!?!
I used 3 coats for each of these swatches and finished off with Caronia Fast-Dry Top Coat. You could probably get away with only 2 coats if you applied them carefully and waited long enough between coats to avoid any bald spots.

I would describe all three of these polishes as crellies. That means they aren’t quite as translucent as jellies but are also not as opaque as cremes. The formula was thicker than what I have experienced in the past with Caronia polishes. Application was a bit tricky due to the thicker formula. But, with a little care, it turns out beautifully! They all dry shiny, and despite having to use thicker coats than normal, they dried pretty fast. I was curious about the different consistency (and I even noted a difference in the scent), so I looked at the label and notice that Caronia has officially joined the ranks of 3-Free brands! Yay! I really hope they are able to make the full switch for all their polishes in past and future collections.


I have a hard time picking a favorite from this bunch. I love them all. They are similar to some colors in my stash, yet they are all so unique. Because they are crellies they look brighter outdoors or in bright lighting and a bit darker in lower light which is fun too, because your nails look different in the sun and indoors. I wore Chasse for several days, and it had great durability.

Suggested retail price (SRP) for this 3-piece (8ml each) set is Php99.75 ($2.22). They are also available individually for SRP Php31 ($0.69) each. A portion of the proceeds earned from “The Art of Dance” collection will be donated to Ballet Philippines’ Noordin Jumalon Scholarship Program, which supports the training of up to 200 dance scholars each year. Additionally, if you live in Luzon, your 3pc. pack just might contain a voucher for 2 free tickets to see Ballet Philippines in action.

Great quality, colors and a great cause to boot! This is a must have! Are you going to get this collection?

Let me know if you have any questions, and I’ll do my best to answer. Thanks for reading. I hope you have a great week!Hugs,
Rach
18 Mar

Review of China Glaze Winter Holly – St. Patrick’s Day Worthy Shade

All products used were purchased by me. 
All opinions are mine. 🙂

Hi!
I don’t celebrate the holiday, but I’ve got a St. Patty’s Day worthy mani to share with you today. I started with one coat of Shisem F610 (Dark Forest Green) which I purchased at Blooming Nail Cebu. I then added 2 coats of China Glaze Winter Holly which my sweet hubby spoiled me with a couple of months go. It is a mixture of gold, green and purple glitter (with a bit of a holo sparkle) suspended in a clear base.

Without topcoat

On it’s own, Winter Holly dries the same way that CG I’m Not Lion does. It’s a grainy or sandy finish. I like polishes like this because you really get two finishes in one. You can choose between the grainy, somewhat matte finish on it’s own, and the super glittery and shiny finish after applying topcoat. I’ve included a few extra shots to show how it looks with top coat.

With one coat of top coat
With two coats of top coat
With 3 coats of top coat and in brighter light. You can see the depth.

I am really happy with this polish. It is so pretty. It was hard to remove in the manner that is typical for a glitter polish. I was kicking myself for not remembering to use my glue base for easy glitter removal. I won’t forget next time (fingers crossed). Also, as you can see, I added some gold studs which I also purchased from Blooming Nail Cebu.

Well, that’s all for me for tonight. I hope you have a great week!
Hugs,
Rach

05 Mar

Dry Brush Nail Art and Stamping with JR17

Some products used were sent to me for my honest review.
All opinions are my own. 🙂

Hello!
It’s late in the evening and I have been up working on a crazy jigsaw puzzle my sister gave me as a gift. TWO THOUSAND pieces! Seriously? The person who thought of making a puzzle over 1000 pieces has a very sick mind. Rant over!


I thought I’d make a quick post for you to share these fun nails I did last weekend. I received two of the new JR Stamping plates from My Online Shop for review. Thanks again, Meann! I picked JR17 and JR2 because I don’t have anything quite like them. I decided to start with an accent nail mani.

I used 4 colors for my base and dry brushing. All of these were sent to me by the very lovely and talented Jacqui of Craftynail. (Thanks again, Jax!) I started with 3 coats of OPI My Vampire is Buff and then used the dry brush technique by Chalkboard Nails and The Lacquerologist to add strokes of OPI Suzi Says Feng Shui, My Paprika is Hotter Than Yours and Sinful Colors Pull Over. I used 2 coats of Suzi Says Feng Shui for the accent nail and stamped an image my son picked out for me from JR17. The little mess up you see with the stamp was total user error. I was trying to hard to center the stamp on the nail and ended up accidentally touching it on a part and then moving it a bit. Oops! But the plate worked perfectly. I played around with several of the stamps on this plate and they all looked great. I’m still working the kinks out of my stamping to my nails skills. Any tips on perfect centering would be very welcome. 😉

You can get your own JR Stamping plates along with awesome stampers and accessories at My Online Shop. They are on Instagram too.

I hope you are having a great week.
Hugs,
Rach

%d bloggers like this: