Hi gals!
I appreciate you sticking around despite it being quiet around here lately. Unfortunately, I’ve been having some personal health issues in addition to keeping up with my regular mommy/wife duties and the blog always takes a back seat to real life. I’m sure you understand, but I thank you just the same for your patience. Y’all rock!
I’ve got a review for you today of a super fun product sent to me by OMG Nail Strips. They make a wide variety of nail strip designs that make for some quick and easy nail art, even if you are just a beginner!
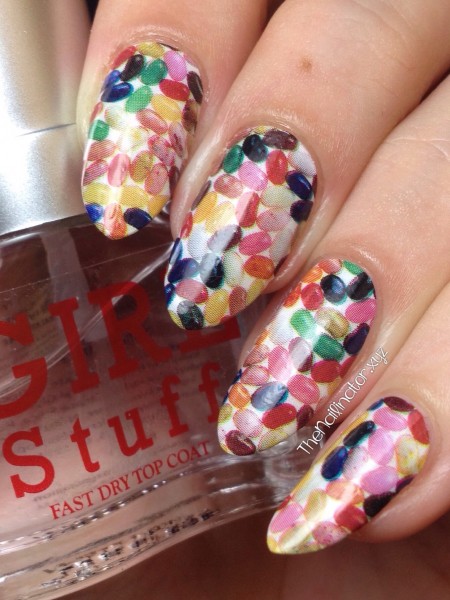
I picked out two designs to try out and today I’m showing you the Jelly Bean design. Even though I don’t like to eat jellybeans, I do think they are so cute and colorful and a very fun idea for nail art! Perfect for a spring mani. Check out how great these look! I got lots of compliments on them.
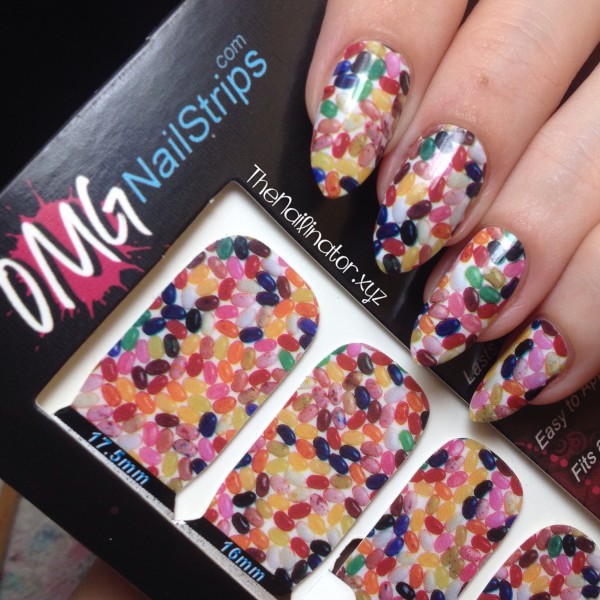
But are they as easy to use as they boast on their site? Yes! They were so easy and quick to apply! Keep in mind that there are different types of nail strips and decals on the market so it’s important to know what you are working with and follow the instructions for each type. I really appreciate that they have a video tutorial on their website which left me feeling confident when I applied these.
Before I started, I pushed back my cuticles and swiped some polish remover on my nail surface to make sure to remove any oil or residue that might prevent the strips from sticking well to the nail. I also used some scissors and cut the sheet of nail strips into individual strips. There are 14 strips total per pack.
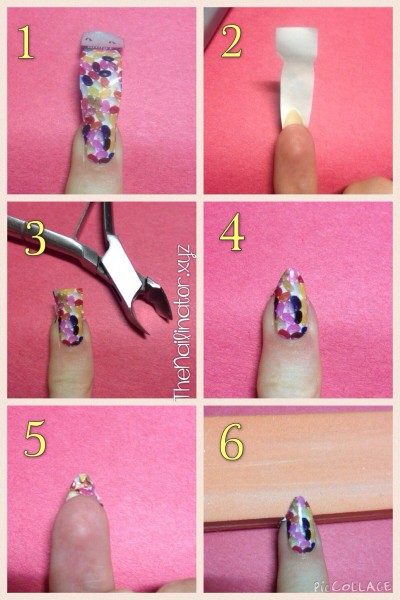
1. After selecting the correct size for my nail, I removed the clear plastic coating on top of the strip and then removed the strip from the stiff paper backing. I centered the strip to my cuticle line and sides of my nail. The underside of the strip is sticky so it is very easy to position it on the nail. It stays put while you work on cutting it down to size, but it’s not so sticky that, if you place it off-center, you can’t pull it off and reposition. It is also sturdy enough that it didn’t tear or stretch when I had to reposition.
2. After I positioned the strip, I was surprised to see how much of the strip was left hanging over the end of my nail. I have long nails, y’all. So these strips would still work on REALLY REALLY long nails. At this point, I used my finger to smooth out any bubbles under the strip. I used my rubber ended cuticle pusher to make sure the edges of the strip were stuck down well.
3. I snipped off the excess overhang of the nail strip with scissors, and since my nails are so skinny, I used my nippers to snip where the strip was a little bit too big for my nail on the sides. If you look closely at the picture, you can see what I did.
4. I used my finger to fold the strip over the free edge of my nail. It was a little tricky at first since my nails are almond shaped and not flat. But I just made sure to press along the edge and to tuck the over-hang under my nail.
5. See the excess tucked up under the tip of my nail?
6. Using a fine grit nail file, I filed along the edge of my nail until the excess came off. I did my best to hold the file parallel with my nail to keep the strip in tact on the tip of my nail. After I was finished, I topped it off with my favorite quick-dry topcoat from Girlstuff.
The packaging says that these last up to 10 days. I wore them for 8 days before I needed a change, but the strips weren’t peeling up around the edges at all. They did have some tip wear but not much considering they endured 8 days on my nails.
Application only took 15 minutes or so (not counting nail prep time). This really is a quick way to get some fine looking nails.
If you want to get your hands nails on some of these OMG Nail Strips, then pop over to their site and take a look. They have everything from skulls, hearts, flowers, feathers, and animal prints. These are $7.99 each or, for a better deal, you can pick 5 designs for $25 with free shipping on any orders. They even have new LED Nail Decals that have an LED that lights up with the NFC fields given off by some phones. How cool is that? Check those out here.
Have you ever tried these nail strips before? What do you think? I really like them, and I know I’ll enjoy showing off the other design I picked out soon. Thank you OMG Nail Strips for sending these to me. They sure were fun to wear!
Have a great weekend and don’t forget to make someone smile!
Hugs,
Rach
Like this:
Like Loading...

