26 Aug

Zentangled Nail Art (Ft. Girlstuff Sophia) 

Hello!

Two posts from me within a week? It’s like old times again! I’m sharing a look I wore a while back. I have recently been on a Zentangle kick and, after making cards and borders for projects, of course the next step was to bring the tangling to my nails!

Girlstuff Sophia with Zentangle Nail art

I started with two easy coats of Girlstuff Sophia. Sophia is a very pretty beige shade with pink undertones. Looking at the bottle, I honestly wasn’t 100% sure it would be very flattering on my skin tone but I was pleasantly surprised. I LOVE it! I was also happy to find that I only needed 2 coats for full opacity and it dried quickly. The Zentangled designs are done with black acrylic paint and a teeny tiny brush. Aren’t they awesome!?!?  Here is a shot of Sophia on its own.

Girlstuff Sophia Swatch

I love that I’ve been finding some neutral colors that I like on my skin tone. By looking at my polish collection I can see that I really favor dark colors. I find it very refreshing to have a clean neutral tone on my nails from time to time. Neutrals also make  great base for nail art.

What is your favorite neutral shade to sport on your nails? And have you ever done any Zentangling? Please take a moment to share in the comments. I hope you have a zentastic day!

Hugs,
Rach


02 Jan

The Nailinator Does Nails

Hi Gals!

Happy New Year! I’ve got a scheduled post for you today as our plans to go out of town pushed through. Hopefully the weather will have cleared up and we have had the chance to soak up some sun while we are by the beach. If not, I’m sure we are having a grand time anyway.

I thought I would do a quick post sharing some of the nail art I have done for friends and family last month. I did a few designs that are seasonal and a few that would be great for any time of the year.

First up we have some fun zebra stripes in Christmas colors that I convinced The Shutterbug (my youngest sister) to let me try on her. If anyone can pull of this look, it’s her! I did the stripes with acrylic paint and a striper brush.

Christmas Zebra Stripes

Next we have some super cute and easy winter wonderland nails I did for The Bookworm (my other younger sister). We started with a light blue base (Sansan Warm Blue), and I stamped snow flakes and an adorable snowman from my OB19 plate that I purchased last year from MyOnline Shop. I added a few tiny dots for a finishing touch.

Winter Wonderland Nail Art

Next up is a look The Queen Mother requested after seeing my Holly Jolly nails. She wanted my holly stamped accent nail with all the other nails in red. I wish I could remember the name of the red she brought along. It is a stunner. I will check with her and update this (then I’ll probably go out and buy it!).

Holly Accent Nail

Next, I’m showing you a look that I was surprised to find I ended up really liking. A friend showed me a picture and I did my best to replicate what she was asking for. First I painted the whole nail in a very light jelly pink. Then I added color to just half of each nail (alternating brown and white). On each brown nail I painted a tiny gold bow. On each white nail I taped off the non-white part of the nail and stamped an image in black over the white. The tape kept the stamping on the white part I had painted before. I added a gold stripe across the nail and was finished. I had never tried a half nail design like this and had also never tried a stamping technique like this. It is always fun to try new things.

Gold Bow

The next look is a floral design, something I’ve done several times before with different color combinations. This lovely lady picked mint green and off white as her base colors and wanted small roses and leaves. This was my first time painting such tiny roses which proved to be a challenge. I did my best, though, and she liked them so that is what counts after all.

Floral Nail Art

The last look I have to share with you is so fun and colorful! My friend wanted rainbow stripes with black strokes. I used a striping brush to paint each color in rows starting from the cuticle out toward the tip (purple, blue, green, yellow, pink and orange). I used black acrylic paint and added the black marks. We did this on her accent nails and thumbs. Since we used 6 colors I suggested we paint the other nails with those colors. They look suuuper cute!

Rainbow Nails

I love doing nails for other people. It is fun to take on the challenge of suggesting things that will suit them and colors that will go with what they have in mind. Do you do nails for family and friends? If you follow me on Instagram you have probably already seen these as I share them there most of the time.

I hope you have had a wonderful holiday vacation so far. Mine has involved lots of food and laughs with my family which is just the way I like it. I’ve been under the weather with a crazy cold that won’t go away. But on the bright side, my hubby has been a darling taking care of me and the kids most of the time. I’m a lucky lady for sure!  Whatever you ended up doing for the New Year, I hope you have had a great time and blessed year ahead!

Hugs!
Rach

10 Feb

Review of Chic Siam (and Freehanded Zebra Stripes)

Hi!
I’ve got another locally made beauty to show you today. Chic has a line of polishes called their “Grainy” collection. I’ve used 4 of the 5 shaded in the collection in the past but this is my first time to use Siam. I applied 2 coats of Siam and used black acrylic paint and a striper brush to free hand some zebra stripes. Yeah, another edgy Valentine’s Day appropriate look!

With topcoat

I added a bow I purchased from Blooming Nail Cebu.

Just like the other shades in the Grainy Collection, Siam dries to a semi matte, slightly textured finish. The light box lighting doesn’t do the sparkle justice at all.

It is so sparkly and I love the slightly textured finish. Siam only required 2 coats for opacity and it wears well. Clean up was easy too. There were a few sparkly bits left behind, but they came off easily when I washed my hands. I would like to note that, even after I applied top coat, it still was a bit textured. So if you want that extra smooth, glossy finish, you might need 2 coats of topcoat. I love this polish just as much as I love the others in this collection. These are available in 10ml bottles for PHP 34.75/US$ 0.78.

Check out the other colors in the collection:
Shadow Crystal
Montana
Peridot
Amethyst
Montana & Amethyst Gradient

I hope you have a great week!
Hugs,
Rachael

14 Jan

Almond Blossoms Nail Art

Hi Girls!
Sorry for the break in our regular programming. I got hit by a nasty cold and suffered through a 6-day-long sinus headache. It was pretty horrible. I’m feeling better now though and only have a mild headache, so I thought I’d get on here and share these with you today.

Have you ever decided to do a design, get all excited and worked up to do it, only to start regretting it as you begin to nail it down? (See what I did there?) That’s what happened to me when I embarked upon this challenge.

If you have been around a while, you know my favorite piece of art is Van Gogh’s Starry Night. I like it so much that I dedicated quite a bit of time to paint it on my nails. My next favorite is his Almond Blossom painting. The very talented Jacqui of Craftynail did a look inspired by this painting last year and it turned out lovely.

I wanted to challenge myself and see if I could do another forgery, and I kept coming back to Almond Blossoms because I just love everything about it. So I decided to go ahead and give it a shot too and let my OCD kick in and try to match the colors and technique as best I could to the original. See for yourself and tell me how you think I did.

Almond Blossoms nail art with decorative bottle

Here is the original just for reference. There’s nail art and then there is nail ART! Please do take a moment to notice the detail work. 😉

Almond Blossoms by Vincent Van Gogh
Source Wiki

I had planned to feature this awesome design for my blogiversary, but I was so run down and tired that I only had time to get the background part done and had to add the details a couple of days later. I used 15 polishes total for this look, plus some black and dark brown acrylic paint for a few spots on the branches. That’s almost ALL polish! Acrylic is much easier to work with if you do detailed work as it doesn’t dry too quickly, but it also does not smooth out and blend with top coat like polish does. So polish is always my preferred medium.

Almond Blossoms four fingers

If you look closely, you will see that each of the nails on my left hand are copied from sections of the actual painting. (Bonus points if you can spot them!) I worked more loosely with the designs on the right hand as I didn’t want to be up all night trying to match it so closely.

Almond Blossoms on cinderella hand

Well, I hope you love these as much as I do. I will leave you with a few more pictures as I just couldn’t bear to leave them out. What is your favorite work of art? Have you done any designs based on works of art? Please leave a link below because I would love to see. Have a fantastic day and don’t forget to make someone smile.
Hugs,
Rach

Almond Blossoms thumb and side view
Almond Blossoms with Chic bottle
Almond Blossoms four fingers another angle
07 Jan

Guest Post by Simply Rins

Howdy!

I’m so excited to have the very talented Rina of Simply Rins stop by for a guest post today. Rina is the very first Filipina nail artist I discovered when I began getting into my hobby obsession and I’ve been stalking her ever since. She has great tutorials and tips and tricks for nail art and always has something creative to share. The tip that still comes to mind for me is to cut out caffeine before you plan to paint to minimize shakiness. It really makes a big difference. Please go check out her blog if you haven’t already. I even recreated her dripping rainbow manicure when I first started my blog. I’ll let her say hello now. 🙂

………………………………………………………………………………………………………….

First of all, I’d like to say “Hello” to all the readers of The Nailinator! It seems timely that I mark the new year with something that I haven’t done before — to guest post! This is definitely the first for Simply Rins. I deeply appreciate the invitation and I hope that this nail art design I came up with will not disappoint.

Now where to begin? How about starting with the fact that we have entered 2014! The past year was full of challenges for me as a blogger. But every turn of the year calls for a celebration. Don’t you think so? No matter what happened the previous year, a new year represents another chance to be better. And so folks, I think my first nail design for 2014 should be a celebration. Only one idea came to mind before I sat down to do this — confetti.

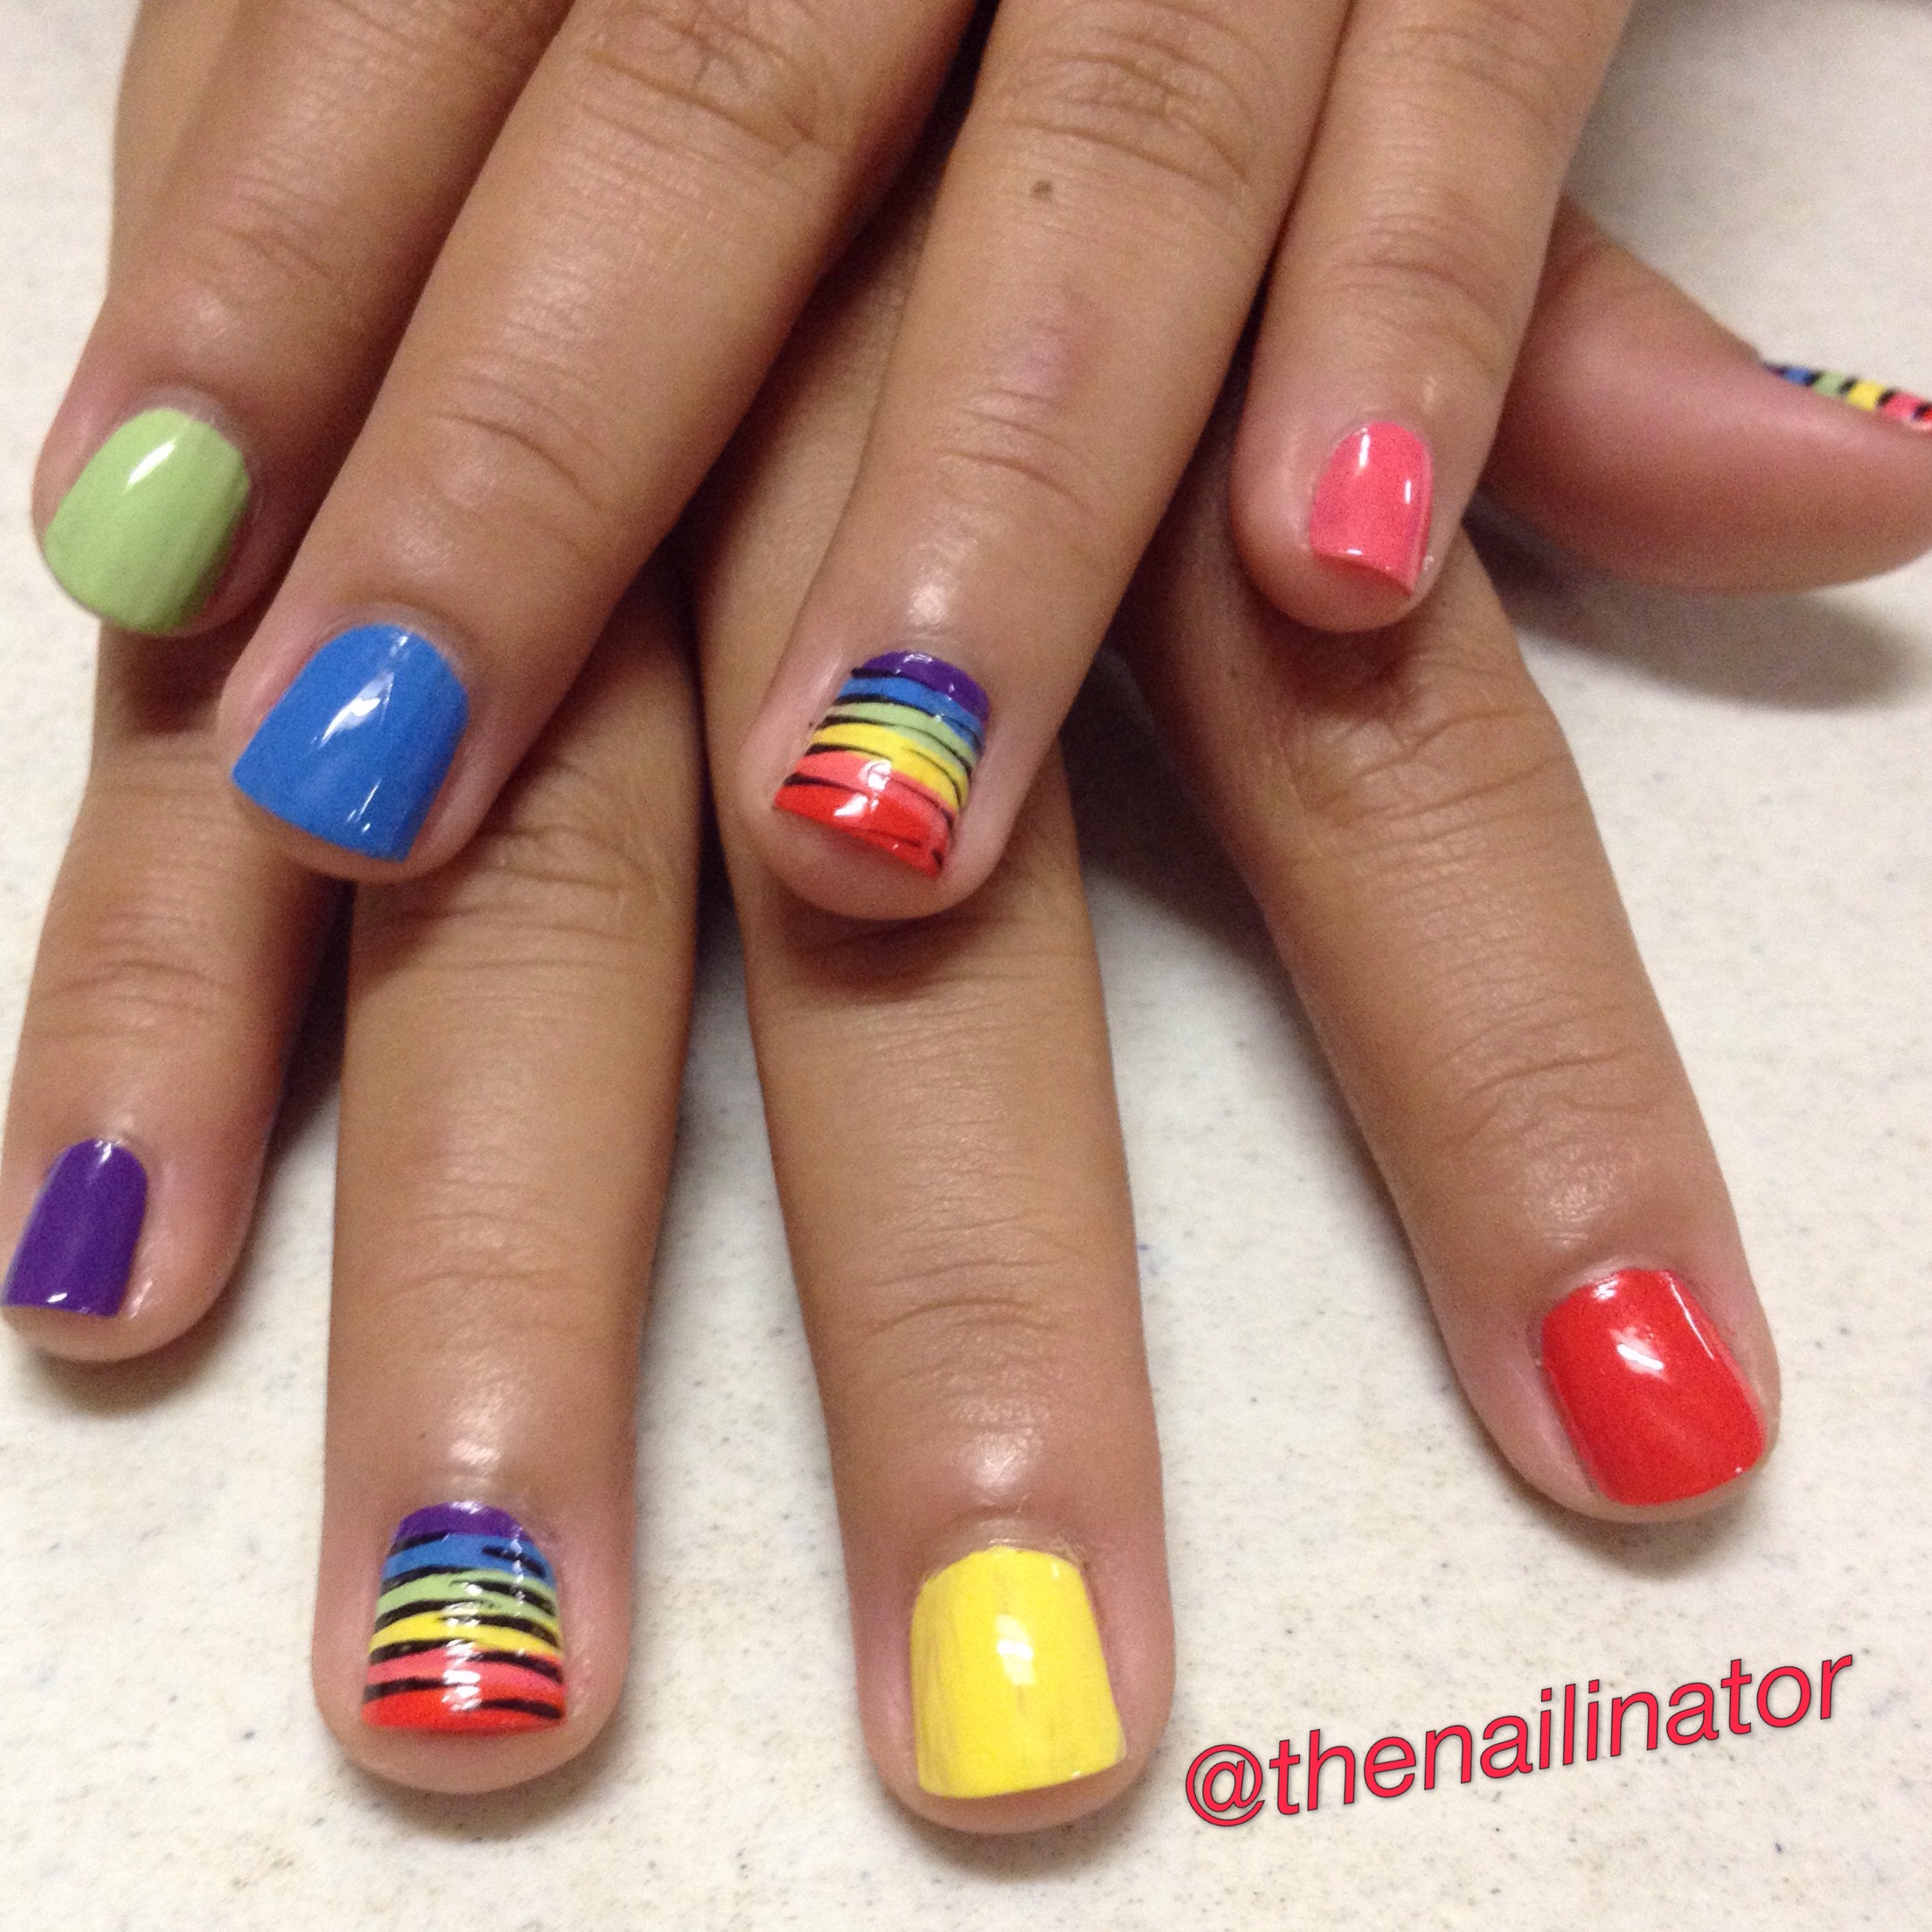
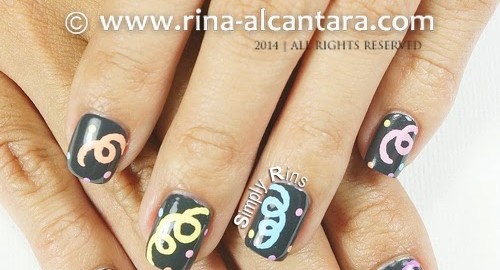
I simply called this nail art, Welcoming 2014:

Welcoming 2014 Nail Art Design by Simply Rins

The idea is to paint colorful confetti on all my nails on a dark background so that the colors would pop. I was imagining confetti being showered on the streets during the new year countdown. I love the effect of contrasts at night.

Welcoming 2014 Nail Art Design on Seche Nouveau

For base, I used 2 coats of Seche Nouveau. I found Seche lacquers being sold in one of the bazaars I went to last October 2013 and I bought a few bottles. I have been meaning to try these ever since the news came out that Seche was launching 45 polish shades into the market. I am a huge fan of Seche Vite fast drying top coat and I am curious how the brand will fair with polishes. With the 3 colors that I have, I must admit it didn’t disappoint!

Nouveau appears charcoal gray on the nails and I love eeeet! I personally feel it is a great alternative to black. Consistency is good that makes application really manageable. Can be a one coater with a generous coat. But I still prefer 2 thin layers for complete coverage. I can’t wait to try the other shades.

Welcoming 2014 Nail Art Design

This is a freehand nail art using acrylic paints and a dotting tool. I find it easier to draw swirls using a dotting tool instead of a nail art brush because I can control the strokes better. A brush can result to a more defined edges or lines. But for this design, I don’t think you really need much precision.

Welcoming 2014 Nail Art

I decided to use pastel colors for the confetti. I particularly used 5 different shades for each nail on both hand. I used the same colors for adding a few dots to fill in awkward spaces. Initially, I thought that neons would look better but I didn’t have any. Are there neon acrylic paints? I think that would be a great addition to my nail art tools. I can also imagine how this would look if they are glowing in the dark!

Welcoming 2014 Nail Art Design by Rina Alcantara

Well, there you have it! A nail art design to celebrate 2014! The concept is simple and it is not so hard to do as well. I had fun painting my nails with this design and quite happy with how it turned out. What do you think?

Thank you again to the wonderful author of this blog for this opportunity to share with you, her dear readers, one of my nail art creations. It is a pleasure to start the year with a chance to reach out to fellow nail art enthusiasts. Happy New Year to everyone! 🙂

 ………………………………………………………………………………………………………….
Aren’t they adorable? The design is so festive and the colors are great. What a great idea to use a dotting tool for the swirls. Don’t forget to check out Rina’s blog to see more great nail art.
Rins, thank you so much for dropping by! I’m honored that you agreed to do a design and have your first guest post be on my blog! I love what you came up with. It was definitely worth the wait! 😉 Happy New Year to you too! I hope 2014 turns out to be your best yet!
%d bloggers like this: